Peugeot 307 Rear Brake Disc and Pad Replacement
The Peugeot 307 rear brake system
This guide will detail how to replace the rear brake discs on a Peugeot 307. Unlike many other guides we will show step by step instructions, with clear images and detail the tips and tricks. The rear discs on the 307 have the wheel bearings inbuilt, which makes the job significantly easier but also makes the rear Peugeot's discs surprisingly expensive.
The brake callipers are retracted via a pressured clockwise motion and without the correct tool it is the most tricky stage of the process. The example car used was a HDI '05 model, there are slight variations but all yearly variations follow the same process.
Safety First
Before we start we must have the obligatory safety overview and we apologise if this is patronising to you. Always perform maintenance on a flat appropriate surface and ensure tools are suitable for the job eg, that the weight of the jack is applicable for the car. If possible, use axis supports in conjunction with the jack. If in doubt never take risks and this guide is provided for information only. The car should not be able to move during the repair so place the car in gear (as the hand brake only holds the back wheels which will be in the air) and place good blocks in front and behind the front wheel.
Peugeot 307 Removal of Rear Brake Discs
Removal of the Rear Wheel From the Car
Rusty brake discs
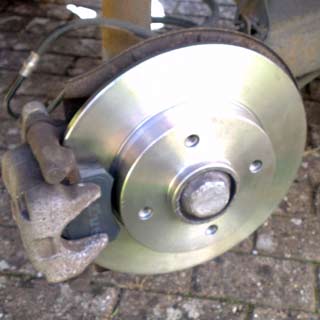
Pretty obvious first stage is to remove the wheel so the braking system can be accessed. Undo each bolt half a turn anti-clockwise when the car is weighted (on the ground). Once bolts are loosened jack the car up and use axial supports to keep car safety lifted. A piece of wood on top of the jack/stand can prevent damage to the car's bodywork.
Remove each of the wheel nuts and store in a suitable container. Remove the wheel carefully as the wheel weighs 7-10kg and is only partially balanced on the hub. This exposes the worn brake pads and rear discs in all of their glory. At this stage double check that the discs that you have purchased are identical to the ones you are about to remove. The hand brake should be released.
Remove of the Brake Caliper

Fig 1 - Location of 307 rear caliper bolts
The callipers hold the brake pads and compress the pads against the disk when the brakes are applied. This in theory should be any easy stage but in practice rust, corrosion and a stupid design can make it challenging.
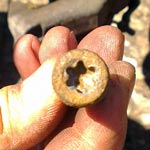
Fig-2 Star bolts
The first stage is to remove the calliper from the calliper support bracket. There are two bolts which hold the unit to the bracket and are located on the rear of the mount, Fig-1. Stupidly the socket is a star shaped key which is loved by French car manufactures Fig-2. These sockets can be weak so always ensure pressure is applied evenly over the bolt, never pulled at an angle.
The socket recess can fill with dirt and rust so it is advisable to clean before with a wire brush or a small screwdriver to remove any derbies so that there is a good contact between the wrench and the bolt.
Gently tap the caliper off if it is rusted to the main support Fig-3.
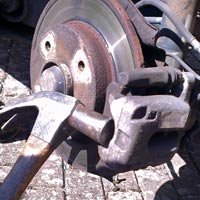
Fig-3 A gentle tap
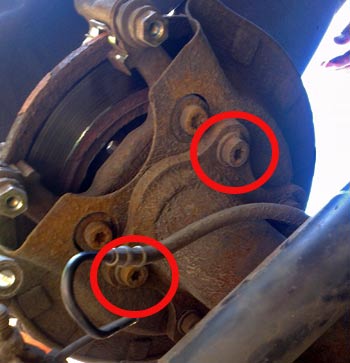
Fig 4 - Location of 307 rear caliper screws
At this stage the calliper is attached to the car via the brake fluid line it is advisable to place it on a block to remove any strain on the piping. Do not remove the brake lines as this is a major job and brake fluid is extremely corrosive.
Next the calliper yoke (the guard and mount block) is removed - The calliper yoke is removed in a similar fashion to the calliper and is held in pace by the two rear calliper screws Fig-4. These again are star screw and will be tight from corrosion so will require directed force to remove.
Do note, these calliper screws are removed by turning anti clockwise but if you are working facing the car they will appear to turn clockwise as the calliper screws are on the opposite side to you.
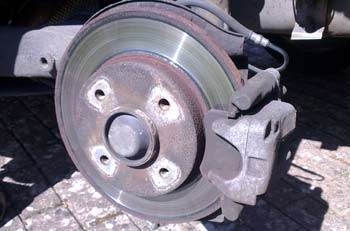
Undo Axle Bolt and Remove Rear Disc
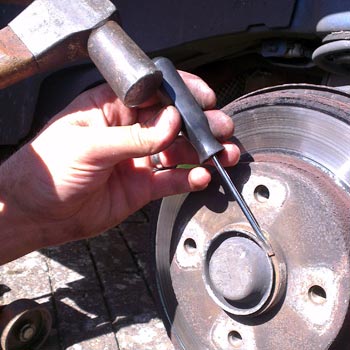
Fig-5 The rear axle dirt cover
The disc is attached to the stub of the axle by a 32mm nut that is covered by a dirt/dust cap. This dust cap is only pressed into place but over time the joint can become rusted and seized.
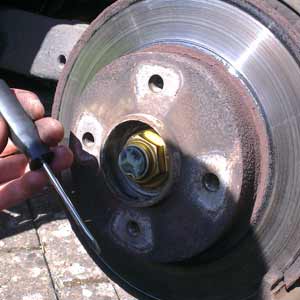
Fig-6 The Peugeot 32mm axle nut
To free the cap use a small screwdriver to gently tap away around the edge until the cap is loosened and pops off, Fig-5. The 32mm axle nut, fig-6, is held in place by a punch to the bolt, use the small screwdriver to lift up the notch. The axle bolt should be easy to undo as it must allow the bearings to rotate freely, also keep the bolt clean to prevent dirt getting into the greased thread.
The disk is now free to be removed but it is usually attached solidly via rust and corrosion - use a hammer to loosen the rear disc by tapping the back of the plate. Some models of Peugeot 307 have two torx screws that hold the disc to hub, if so undo the bolts, if not hit the disc harder!
Clean and Removal of the 307 ABS Sensor
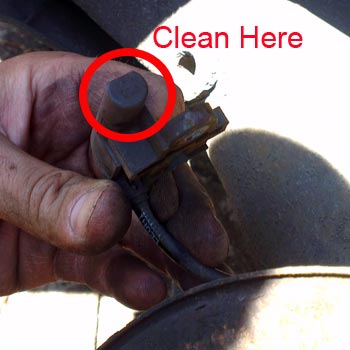
Fig-7 Clean The 307 ABS Sensor
One of the most common faults of the Peugeot 307 is the ABS warning error and associated Christmas-tree light dashboard. The ABS sensor for rear wheels is directly behind the disc and the attachment bolt is only accessible once the disc is removed. The Peugeot 307 rear disc set does not provide a new abs sensor but there is a new magnetised strip, which the sensor detects, on the rear side of the disc.
Usually the fault is with the sensor not the magnetic strip. It is recommended to clean the end of the sensor, Fig-7, at this stage as this is a very common issue with the car. The sensor is held in place by an Allen key bolt and weak plastic clip but it is advisable to clean without removing it - there must be an exact gap of 1-2mm between sensor and magnetic strip otherwise the ABS fault is registered.
Retract The Caliper
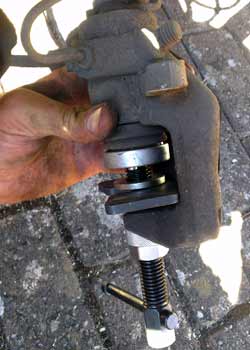
Fig-8 307 brake rewind tool
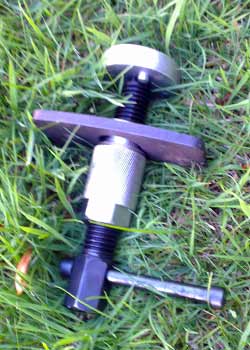
The Peugeot Caliper tool
This is the most fiddle and annoying stage of the replacement of the rear disks and pads. The calliper can only be compressed in a clockwise twisting motion. A simple g-clap compression does not work and will only damage the internal thread.
The calliper retracts on a clockwise motion but requires many turns combined with significant pressure. A specialist calliper tool, a brake rewind tool, Fig-8, is the simplest method and reduces the hours (literally) of work. The brake rewind tool costs between $30-$40 /£20-30 / €25-38.
The rubber dust cover can be folded back on itself to make gripping it easier, if not using the rewind tool. The depth of the thread on the calliper tool and the calliper depth may not exactly align, so it may be necessary to twist the calliper (clockwise) without any compression pressure.
Put New Parts Back Together
Three quarters of the job time is required to dismantle the braking system, putting it all back together is significantly easier and is the absolute reverse of the previous stages. The key observation is not over tightening the 32mm axial bolt, simply align the axial recess with the punch in the bolt and re punch.
Attach New Disc Place the new disc on the axle spindle and tighten with the 32mm axle nut. This nut must not be over tightened otherwise the bearing will not be able to rotate smoothly and the wheel will become seized. The notch which prevents the nut from loosen is a very useful guide to the exact required torque. Line the notch on the bolt to the gap on the central bar and tap with a hammer to prevent movement.
Replace Caliper and Pads
Attach the brake mounting on the Peugeot 307 using the two star thread bolts. Brake pads should always be replaced at the same time as the disc. If the old pads are reused the brake will initially have poor braking efficiency and the discs will become badly scratched and this is just a false economy. Place the two new brake pads next to the disc and attach the calliper using the two star bolts. This can be tricky as the two new brake pads are spring loaded and push the calliper off centre. This is the stage to test the new disc and pads, without starting the engine (as the car is in gear) pump the brake pedal five times and then hold get a friend to check that the brake is locking up. If the brakes are good attach the wheel.
Related Pages and Random Possibly Useful Guides