
Welcome to Help Computer Guides
Welcome to HelpComputerGuides, trusted informative guides for your everyday
What image size, how to resize a picture when to crop a visual for your busines website and marketing
How to resize an image
Written by: Darren Hignett
Resizing an image to fit the different marketing platform is important. Images for Instagram need to be square while images for websites, email campaigns and platforms such as LinkedIn and Twitter need to be in a landscape format.
Below is advice on how to resize an image as well as how to crop and layer images using Stencil. Similar features also exist with other design apps such as Canva.
Imagine you have an image that’s the wrong size for a Facebook post. You can import it into a design app and then resize it. To do this, you need to set the canvas size to the format you want (i.e., Facebook post format).
Then import the image you have into the app and drag it on the canvas to fit. Alternatively, apps such as Stencil have a feature that allows you to set the image as the background. This automatically increases (or reduces) the size of the image to fit the canvas format.
Note: On this page, we use Stencil to demonstrate how to achieve what you are looking for. You can find out more about Stencil here.
Below are instructions for how to do this with Stencil.
Switching canvas size to fit you image or picture
A huge frustration with posting images online is the vast range of sizes and dimensions that are needed. If you create a great image for Instagram that’s square, you can be fairly sure it won’t look right as a banner on a website when looking at the site on a desktop. And an image for a website looks differently on a mobile, as well as in an email campaign or on Twitter, and as for Pinterest…
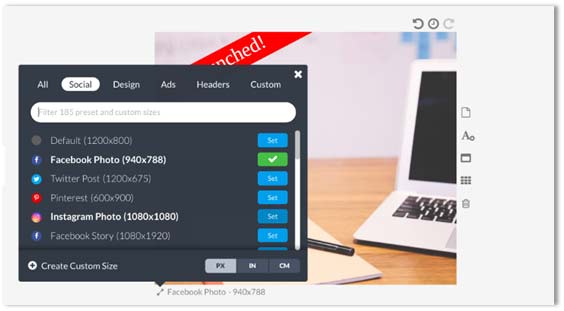
It’s unlikely that there will be common dimensions across all these platforms soon, but the good news is that you can easily re-size any artwork you have created. Underneath the canvas is a bi-directional arrow followed by the current setting for the size of the canvas. Click on this and select which format size you would like. You can then re-size your image to fit your channel.
The default figures are in pixels, but you can change these to inches and centimeters by selecting the relevant option in the toolbar.
Design Tip! For the Instagram feed, always select Instagram Photo 1080 x 1080 but if you want to save time on designing artwork for multiple channels then use the LinkedIn Photo 1400x800 for LinkedIn, Twitter and Facebook posts as well as for blog posts and email marketing headers.
This might not be the case for some websites and email platforms but 1400x800 is a good format for a large number of marketing channels and sticking with this format can save you a lot of time, and the visual will still look great when published online.
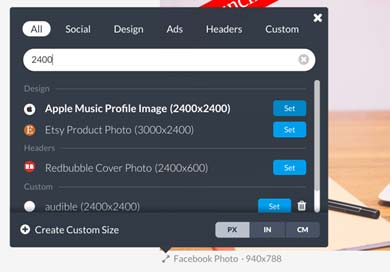
If you have specific requirements that aren’t shown in Stencil, you can create your own. Let’s imagine that you need to create an image for a platform that requires the image to be super-wide at 2400 x 400 pixels format.
To create your own custom size template, click on the bi-directional arrow (right underneath the canvas to the left and next to the name of the name of the current template) and select Custom. Then select Create Custom Size and enter the dimensions (which in the above example would be 2400 for width and 400 for height) and don’t forget to give it a name such as ‘super-wide’ or you can name it after the platform that you are creating it for.
If you need to set the format in inches or centimeters you can also do that by clicking on the relevant option before clicking on Create. You have now created your own template that will appear under the Custom tab in the toolbar. You now just need to select it by clicking on Set!
Pro Tip! Before you go creating a whole heap of custom formats that you might only use once, make sure to check the format size you want doesn’t already exist. In the search box of the toolbar, you can search by dimension.
For example, if you need a 2400x2400 pixel canvas size, type in 2400 and you will see 2400x2400 appear as Apple Music Profile Image. I learnt the hard way after I created a custom template for my Audiobook cover image that’s the same size. If only I had read the tips on this website first!
Layering your image and visual
When you add multiple elements to a canvas, you can also layer them so that some images sit on top of another. This really helps to make design work look great as you can hide away unwanted parts and blend multiple image elements together.
To control how elements are layered, click on a photo or picture that’s on your canvas and from the menu that pops up, select ‘Move back’ or ‘Move forward’. The element will then be moved back or forward a layer.
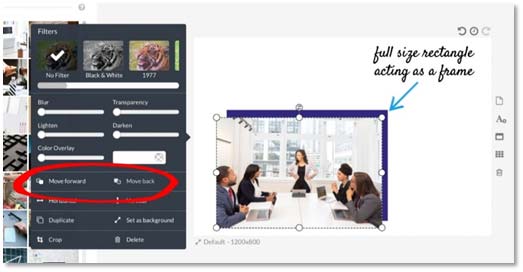
This only works if you have two or more elements on the canvas that aren’t the background image (you can’t layer the background image; it is always at the back!). Elements that you can re-order include anything you have uploaded, pictures from the Picture area and any text that you have added.
As well as layering your elements, you can also move them around so that elements at the back still visibly show the parts you want to be visible.
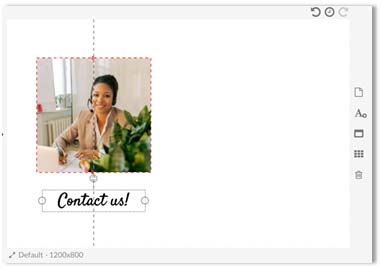
Pro Tip! When you move elements around on the canvas, dotted lines will appear horizontally and/or vertically across the canvas to show you when that element is aligned with other images. This is a great way to make sure that images, text and icons line up perfectly! Dotted lines also appear with arrows at the end to show you when an element is centered on the canvas.
Below is an example of wording being aligned with the wording above it. The dotted line appears once the wording is aligned.
When you click on an element, a dotted frame also appears around the element with white circles. Hover over one of the white circles to see what it does (your mouse pointer will change to show you) and click on it and drag the image to make the changes.
If, when hovering over it, the mouse icon changes to show arrows in two directions then that means you can resize the element by clicking and dragging the box left or right.
Insight: There are various apps you can use to create great content, whether it’s visual content or text. For more information on the various apps, you can use, read 7 Great Tools to help you with your content marketing.
Another circle also shows up with two rotating arrows. This is normally at the top of the element and can be used to rotate the element. This is especially useful when layering and using objects such as triangles to create different effects in the corner of your canvas.
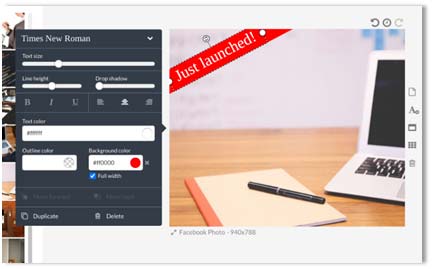
Pro Tip! Create a banner across your image with wording such as “Just launched!”. To do this, create a text with those words, then bring up the editor by clicking on the text box and select a color for the text AND a color for the background (a red background with white text for example). Underneath the background color, select ‘Full width’. Now drag the text box to the top left corner and rotate it so that the wording goes up from left to right. You now have a banner that stands out on your image!
Make the elements of the image or picture standout
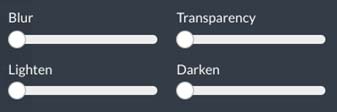
Another way to make images stand out when layering is by blurring or darkening elements that are in the background. Blurring is a great way to keep the focus on the text box or image that’s at the front but personally, I prefer darkening elements. This makes the elements you want people to focus on stand out more.
To blur or darken an image, bring up the editor for that element and use the slider next to the labelled wording Blur or Darken. You can then edit the appearance of the element to the level that looks right.
You can also use the Lighten, Transparency and Color Overlay options. Feel free to have a play around with those as well to get the effect that’s right for you.
Next chapter
- How to add words to an image.